
Utilisateur:Hawk/Transcriptions web
Official Halo Wars Community Site (halowars.com)
Game Info
Overview
-"If they want war, we'll give 'em war."
The Game
Halo Wars is a real-time action strategy game for the Xbox 360 that allows the player to control large armies and to shrewdly direct them in realistic warfare. Set early in the iconic war between the Covenant and UNSC - made famous by the Halo FPS games - Halo Wars provides a new angle on the war while bringing new heroes to the battle.
In Halo Wars fans will be able to control armies of units that are familiar to them from the FPS games, such as UNSC Marines, Scorpion Tanks, and the iconic Warthog. Our E3 demo video gives a narrated first look at the game, and you can download it from our movies page.
The Controls
We've spent a great deal of time simply on getting the controls right. Halo Wars was created for the Xbox 360 from the ground up, which meant we didn't have to make compromises or shoe-horn in artifacts from a Windows PC game. We were able to take all the best aspects of RTS games, make them work perfectly on the Xbox 360, and exclude the rest.
The Developer
Halo Wars was developed by Ensemble Studios in Dallas, Texas. They were the developers behind the award winning Age of Empires series of real-time strategy games.
Halo Wars was released around the world on March 3rd, 2009. Please visit our FAQ page for answers to common questions.
Skirmish Maps
Here you'll find information about all of Halo Wars' Skirmish Maps. If the thumbnail is clickable, it will take you to a page about that map.
On each page you'll find snippets about the map from designers and artists, as well as much larger images of the maps, and a Y-Axis shot allowing you to plan avenues of attack.
If a thumbnail isn't clickable yet, check back in the future, as we'll be rolling them out as time goes by.
3v3 Maps
Exile
Fort Deen
Frozen Valley
Glacial Ravine
.jpg)
.jpg)
.jpg)
.jpg)
<toggledisplay showtext="Exile 3v3" hidetext="Réduire">
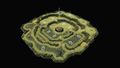
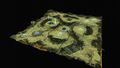
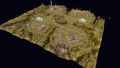
Exile 3v3
Artist Notes
Paul Slusser, an Artist who worked on Exile tells us a bit about his work on the map.
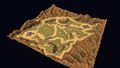
Exile was one of the maps we created toward the end of the development cycle, so we pretty much knew going into it what kind of things to avoid.Since 3v3 maps are our worst performance maps, due to the amount of units it could have on screen at any given time, we knew this maps had to be pretty simplistic. Minimal use of terrain objects/vegetation and no water/lava, which actually worked out nicely since the setting was to represent a lifeless, dried up planet.
.jpg)
One of the hardest parts of creating Exile had to be alignment of the terrain to the bordering Forerunner structure along the outer edges. I had originally planned on using a very large masking technique to handle this, but after a few attempts I realized that was not going to work for something that needed this type of pixel perfect alignment. So I had to slowly sculpt and blend the terrain by hand all the way around one of our largest maps. My favorite tactic on this map was to gain control over the free reactors and always get my team to hit the player on the outer most ring first. I found that the players that got placed in the middle where always planning for incoming attacks and would hesitate sending their forces away from their base to support allies.
Designer Notes
Justin Rouse, a skirmish map Designer, gives us one of his tactics:
Tactics: On exile I tend to let my start placement dictate my strategy more so than other maps. If I’m the center start position I like to rush hard and force the opposing center start player to call for help, keeping his teammates from doing what they want. If I’m either of the other two start locations I tend to go for an all out boom to tech’d up air units hoping our center position teammate can hold out while I try to get there.
Exile was originally called “Bowl_3_SWE” during the majority of development, so I always have to think twice what people are talking about when they say Exile.
.jpg)
</toggledisplay>
<toggledisplay showtext="Fort Deen - 3v3" hidetext="Réduire">
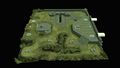
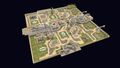
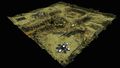
Fort Deen - 3v3
Designer Notes
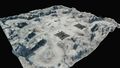
Fort Deen went through some iterations on gameplay because we wanted this map to feel like each player was pretty safe from the rush. Originally we only had one player per team start in the elevated “safer” areas with his two teammates starting on the outskirts. With the long distance from one side to the other on this map it was still easy enough for two players on one team to rush down the side of the map and hit the edge player with enough time to do serious damage before the edge player’s teammates could react and send help, very much like Frozen Valley and we wanted something different. The simple change of moving the starting locations for all three players up the ledge really helped achieve this. To reinforce this goal we put wall hooks and creep groups down the side paths to help hinder the early rush.
.jpg)
Justin Rouse, Multiplayer Map Designer, gives us one of his tactics:
Tactics: On this map I love to use Brute commando squads. Since they’re infantry I can put them into the wall towers and block off my enemies ground forces but because of my brute jump packs I can jump back and forth over the walls to get away from danger or to closer to juicy targets coming to shoot my units out of the towers. Once my team has the upper hand it can still be very difficult to crack the enemy team’s starting base location since they’re in close proximity to each other up on the ledges. While the enemy has their forces at one of the two choke points trying to stop my teammates tank/air combo and my brute chief from storming in, I like to walk my army of brute commandos up to the front wall in the center, where they usually only have missile towers for air to come over, and jumppack my brutes into the back of their base. When they figure out what I’m doing and send some troops over to stop me I jump my brutes back down and run away and repeat the process once they move back to the front.
.jpg)
</toggledisplay>
<toggledisplay showtext="Frozen Valley 3v3" hidetext="Réduire">
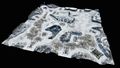
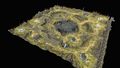
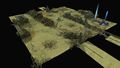
Frozen Valley 3v3
Designer Notes
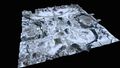
Justin Rouse, a skirmish map designer, dishes out some info on Frozen Valley: Frozen Valley was the first 3v3 map designed during the development of Halo Wars. After Chasms, this was probably our most played map through internal playtesting. The layout went through one major tweak throughout development and that was the opening down between the teams that runs along the bottom edge on picture shown here. The first iteration had the hole as well as the mount near that bottom edge of the map extend all the way to the edge. Leaving a pocket only access through the middle by land units. It allowed the two bottom player on each team to build up safely.
As map “hooks” came online I wanted them to be easily attacked from different angles and only having 2 paths between teams was making this too difficult. Once the bottom side path was opened leaving a “3-way” go between the teams, along with the hooks placed on the map, more strategic options became available and the map became extremely fun. Before, it was just a fairly straight forward map.
.jpg)
Designer Notes
Duncan Stanley, Community Manger for Robot, talks about Frozen Valley:
Frozen Valley was actually one of my least played maps during development. When it came to playtesting, I was usually available for the 1v1 and 2v2 playtest sessions (where I'd throw down with Thunder), so I rarely got to play Frozen Valley. Nonetheless, my incessant whining about the OPness of the Warthog got it toned down (yes, you read that right) before launch. Warthogs during development were almost immune to infantry up until RPGs entered the equation.
But on to Tactics! Your strategy for the game usually depends on if you're in the pocket (the middle) of your side or not. If you are, it's usually safe for you to boom and go for higher-tech units, possible swooping in to save the day at the last minute. If you're on either of the sides, you're usually in the thick of it with your opponents across the way fairly quickly over the expansions. As always, trying to grab your opponents nearest base is a good tactic to throwing their game off, if a bit risky.
Also, all the extra bases around the map mean that if you can protect them, you can get a ton of resources and build up armies very quickly. Personally, I like to go air if I'm Anders, or Tanks if I'm Forge on this map, they seem to cover the distance very quickly and can usually survive long enough for you to accomplish your goals with them.
.jpg)
</toggledisplay>
<toggledisplay showtext="Glacial Ravine 3v3" hidetext="Réduire">
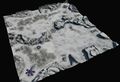
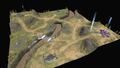
Glacial Ravine 3v3
Designer Notes
Justin Rouse, a skirmish map Designer, talks about Glacial Ravine
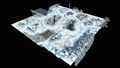
Originally, our DLC2 pack (Historic Battles) was intended to contain only 3 maps: Barrens, Blood River, and Memorial Basin. After seeing the outcry for more 3v3 maps we took a look at what it would take to get one into the Pack. We did some due diligence and realized we didn’t have the time to create a new 3v3 from scratch, get it through testing, and put it into the map pack. So we compromised by repurposing an existing map, which allowed us to reduce developer time enough to get Glacial Ravine out the door with the others. We decided on using Frozen Valley as our base map because the majority of the bases were on the outer edge of the map which left us with a lot of central area to manipulate for game play rather than worrying about meeting our base requirement needs. Since this map was very open, and all of our 3v3’s had multi routes to the enemy we decided to go with a more focused front and funnel everyone through the middle. Adding in the wall towers allows players to control the “line” between them and their enemies easier than any of the other 3v3’s. With large scale battles happing in 1 place, this seemed like a perfect map to add the Sentinel Factory to giving everyone access to the Super Sentinel to be a stunning menace to large armies moving through the middle pass. There is only 1 free floating base location on each side of the map now so teams will have to strategize for which player gets the extra/3rd base location, also making the creeps at this location a bit tougher slows players from taking it just a tad.
.jpg)
Multiplayer Tactics
Tactics: On Glacial Ravine I like to use the Covenant and take advantage of the Scarab walking over cliffs and surprising the enemy with beams of death raining down from the hillside. Obviously, you can use any leader here but I prefer the Brute Chieftain for his Brute commandos. Using his brute commandos built from bases themselves allows me to use my building sockets to boom and get shield protection from air attacks. They also give me an infantry unit which I can use to garrison in the wall towers and hold the middle of the map for my team. If the other team takes control of the center wall towers upgrading the commandos to have jump packs allows me to move my forces over their walls and harass them while hopefully being able to jump back over to safety when they start to hunt my forces down. If my teammates haven’t crushed the enemy by this time I’m usually ready to get out an early Scarab. I usually don’t have much to support him but walking him over the center cliffs to surprise the enemy is very effective. Usually the entire enemy team scrambles to deal with my Scarab my teammates have free reign to attack other key locations.
.jpg)
</toggledisplay>
2v2 Maps

Beasley's Plateau
Crevice
The Docks
Labyrinth
Repository
Terminal Moraine
Memorial Basin
.jpg)
.jpg)
.jpg)
.jpg)
.jpg)
.jpg)
.jpg)
<toggledisplay showtext="Beasleys Plateau 2v2" hidetext="Réduire">
Beasley's Plateau 2v2
Programmer Notes
Chris Stark, Programmer on Halo Wars, talks about his strategies on Beasley's Plateau.
Beasley’s Plateau is probably one of my favorite 2v2 maps. The wide open space gives me plenty of room to maneuver and sneak my army up next to the enemy base before they realize I’m coming. One of my favorite tricks on Beasley’s is to use my scout and a couple of friends to sneak over and grab unused sockets at the start of the game. It’s a great way to get my econ boosted, or start cranking out troops right next to the enemy.
I always try to make sure to take out sockets on the way to the enemy base, that way it’s harder for the enemy to regroup. However, I also like to just attack the sockets with a few troops, and then move the bulk of my army around the other side of their base. As soon as they get their troops over to defend the sockets, I rush in and take out their base.
.jpg)
Designer Notes
Justin Rouse, a skirmish map Designer, gives us one of his tactics:
I like going with a Forge infantry rush on this map because of the extra building sockets near the starting bases. I quickly clear the rebels there and build 2 supply pads on the those sockets. The extra resources allows me to pump infantry and warthogs at the same time. I use this force to get over to the enemy’s free standing sockets since many players will build on them quickly and use the extra buildings to tech/boom faster. If I can take down these buildings I can usually put my opponent into a hole off the start. At that point, if I can keep the pressure on them they’ll begin to crumble.
The other notable thing to do on Beasley’s is to get the Life Support hook in the center. The mistake a lot of people make is they go for this too early in the game. This hook is extremely powerful (+20~25% to total max pop with reinforcements upgraded) but its power will go unused if you acquire this hook before you’re ready to use the population space. You should always wait until you’re near pop cap before fighting the tough rebels at this location, but even if you can’t make use of the pop room its still a good idea to make sure you’re in control of it and not your enemy.
.jpg)
</toggledisplay>
<toggledisplay showtext="Crevice 2v2" hidetext="Réduire">
Crevice 2v2
Designer Notes
Paul Jaquays, Skirmish Map Artist, talks about developing Crevice:
Memorable game maps spring from a melding of design intent and fortunate accidents. It can begin with an innovative design layout, perhaps pushing a tried and true layout from an earlier RTS in a new direction. It develops as designers attempt clever, but technically risky game play gimmicks. It takes final shape with art that pushes the envelope. For every map that succeeds, there are likely to be two (or more) that fail, stumbling, and then falling never to rise again on the path to production. Crevice was a map that stumbled more than once, fell, yet got back up and kept going.
Crevice a.k.a. Crevasse, etc. started with the earliest pack of map designs. It was one of the first maps I worked on as I shifted from model-making to map making on Halo Wars. Like Repository it began as a Shield World Interior (aka "Halo style") map. Given the "circular" layout and how Forerunner artifacts were originally placed on the map, it was sometimes confused for Repository. Not the best thing if one is trying for memorable.
.jpg)
Good maps are often built around a "gimmick," some game play function or activity that needs to be supported or encouraged. Initially, this gimmick was "Transport." The center of the map had an isolated central platform with a valuable forerunner artifact that could ony be reached by air-lifting army out to it. Coincidentally, it was also a strategic position upon which artillery pieces and turrets could be placed (this was pre-modular bases). Through the early stages of Halo Wars development, the Transport feature waffled between unsatisfactory functionality and simple unfunctionality. Long before Transport became a working feature, the notion of using it in Crevice had been discarded.
Despite this stumble and near fall, Crevice survived because it had an intriguing layout of start positions. Players, both allies and enemies, began relatively near each other towards the center of the map. To reach an enemy, players had to go away from them first to the outer portions of the map.
.jpg)
During development, Crevice shifted from the inside of the Shield World to the outside. To achieve this, I painted over a screen capture of the current version of the map, sketching out ideas for details on notebook paper. The design rework of the map had turned the central platform into a big hole. I suggested changing this into a playable area, a partially buried circular Forerunner platform. One feature I wanted to play up was the "bouncy-ness" of the warthogs, so where possible, I sculpted in small steps and shelves into the terrain. The UNSC portable bridges were adapted from the early campaign maps (via a quick paint job that turned snow to yellow dust) and retasked on this map (kudos to artist Don Gagen for both the original bridge and the clean-up for this map).
The switch to Shield World Exterior brought with it two new game play features centered around the Flood creeps infesting the map. The First, and core concept was "the Flood come out at night." Art created a day and night light-set for the map. Programming implemented a way to cycle and blend between the two light sets. Design built complex, yet elegant paths for flocks of flying flood to follow, focusing on the foundation locations of the player bases.
It worked. It was beautiful to behold. It was a serious game play challenge. Yet it completely flushed game performance down the toilet and ultimately, had to be abandoned.
.jpg)
The second concept was related to the first, that of the Flood Slayer, a mobile Forerunner artifact, player-capturable and controllable (possibly a vehicle or a super sentinel). I don't remember this going much beyond the idea stage, though there may have been something built for it (super sentinels eventually appeared in other maps). I definitely never got the chance to play test it.
Another idea abandoned, another stumble, even a fall. But it was not a failure. By this point Crevice was a a nearly complete production map well on its way to completion and despite the failed Flood features, was still a fun map, and just as important, a memorable map.
If I have any regrets on this one, it's that we didn't get to implement those awesome toxic slime waterfalls into the map.
Paul Jaquays is a former Ensemble Studios artist who now develops games as Senior Level Designer for CCP North America.
.jpg)
Multiplayer Notes
Duncan Stanley, Community Manager for Halo Wars, on Crevice:
Crevice can be a confusing map, since there aren't any direct paths from each teams starting location to the opponents bases, except by air. There are plenty of extra bases on this map for expansions, as well as 4(!) reactors across the map. Given the large distance and creeps in between everything, it is usually a good idea to team up with your ally to capture objectives.
I usually go for the reactor near the Flood expansion near me and occupy that early on. It gives me a bit of early warning if my opponent comes at me that way, and the extra tech is very nice as well. I also try to take that base early, since it's the closest expansion to the opponents main base. If I manage to get it, I try to make that base my unit producing one, so that my opponent is pressured constantly. You do have to be careful of air units coming at you over the very short gap between bases though, anti-air turrets or a Wolverine or two are very helpful on this map.
If I know that the game is going to drag on, and it's going to be a big battle for the Flood-expansion, the 2 free bases inbetween my ally and me are also a great resource to use. If I can convince my opponent to live with just his 1 flood expansion, I can sometimes get both of the back bases, and churn out a bunch of air units to harass my opponents while my ally takes out their bases. Crevice is a pretty good non-standard map for trying new things.
.jpg)
</toggledisplay>
<toggledisplay showtext="Docks 2v2" hidetext="Réduire">
Docks 2v2
Designer Notes
Justin Rouse, Designer on Halo Wars, talks about his strategies on Docks.
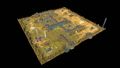
Iterations: The_Docks, our city map on arcadia world, was a difficult map to create because we had to stick to our core gameplay which did not include any building to building fighting which is the usual type of fighting style you see in city based conflicts. We also placed a rule on ourselves that because this map was on Arcadia, in a pristine UNSC city it couldn’t have large forerunner structures in it nor could it have the look of a large covenant presence. This limited the designer of the map a lot because it took away a lot the available in game “hooks” we had available to add to gameplay. What we settled on was a large section of the city of “Pirth” that conveniently had only one passable location in the center to move between two sides. We also added a few covenant towers to help defend this large choke point that can give some flavor to the large battles that usually occur in this location.
Tactic: Because of the choke point and decent travel time from one side to the other early in the game, it’s pretty safe too boom up. This is why I really like using Cutter and elephant/marine rushing on this map. If I can setup my Elephant near the enemy bases and get it pumping I can slow down their boom sometimes, even keeping them off the open base location near their start area while my partner boom/techs freely. This tends to leave me behind the curve a bit but I can still get to ODST’s and just support my teammate until we can get the win.
.jpg)
Multiplayer Notes
Duncan Stanley, Community Manager for Halo Wars, on Docks:
Docks was a map that I hadn't really playtested much on during development. I was usually playing Campaign missions or 1v1 games, so I never really got into many 2v2 matches. When Halo Wars first launched I was online playing Multiplayer games every night after work to get out there and talk to people in game and get a feel for how the Community was going. I was doing pretty well, about 14-0 in 1v1 games, when all of a sudden I found myself on Docks. It's a 2v2 map, but due to a glitch was in the 1v1 hopper for a time. While the game was loading, I looked up my partner's game stats on HaloWars.com so I could see what he had built in previous games. This tactic was usually pretty good, as I could build a counter without even scouting!
Unfortunately my tactic only works if my opponent doesn't adapt to my strategy. I had pumped out a few Flame Marines and built a turret and was waiting for resources to expand to one of the many free bases on docks when my opponents Brute Chieftan showed up with a few packs of Brutes. A melee ensued and my units got crushed by his skillful micromanagement and kiting. I was pumping out more marines, and my turrets were having an effect, when a Banshee showed up, and then another, and then another. I had spent too much time countering his ground units that I had completely forgot about the huge wall in the middle, and the necessity of air units. To end this quickly, he wrecked me. I was too confident that since I knew what he was going to try, that I didn't really try to adapt. So don't be too confident!
.jpg)
</toggledisplay>
<toggledisplay showtext="Labyrinth 2v2" hidetext="Réduire">
Labyrinth 2v2
Programmer Notes
Chris Stark, Programmer on Halo Wars, talks about his strategies on Docks.
During the development of Halo Wars, I did a lot of work on the teleporters in the game, including the ones on Labyrinth. Teleporters sound awfully easy to write, don’t they? Unit goes in one side, unit appears on the other side, done! Sadly, there are a variety of fun edge cases that have to be dealt with. One of my “favorite” teleporter bugs that came up during development resulted in units going through the teleporter leaving tire tracks going across the entire map.
Behind the scenes in Halo Wars, when you move a unit to a new position, it’s interpolated, so when I moved the unit across the map to the other teleporter, it was interpolated across the map. When vehicles move, they leave tire tracks, so presto! Tire tracks across the map. Admittedly, it was pretty funny but nothing we could ship. Fortunately, fixing this was as easy as turning the interpolation flag off when a unit went into the teleporter and then back on when it reached the other side.
.jpg)
Multiplayer Notes
Duncan Stanley, Community Manager for Halo Wars, on Labyrinth:
Labyrinth is one of my favorite maps, mostly because it was the one that was Dave Pottinger (Halo Wars Lead Designer) demo'd on G4TV at E3 2008. If you haven't seen it, you definitely should look for the video online, it's one of the funnier game demos I have seen. It brings a new meaning to turkey bacon.
As far as gamplay goes, Labyrinth was one of the maps I played most while playtesting. There was a really good challenge the designers set for us, which was fastest time to beat 2 Legendary AI players in a 2v2 skirmish. The Skirmish AI is pretty good at keeping you from having both natural expansions at the same time, so it was always a back and forth for me and I usually ended up losing until I had one of the balance testers as my partners. He showed me that having a good defense, only going for 2 bases total and going for air on this map is very effective, given that it takes quite a while to traverse the map. Trying to keep and hold both expansions can be tough, so take your time and get a good foothold before going for both.
.jpg)
</toggledisplay>
<toggledisplay showtext="Repository 2v2" hidetext="Réduire">
Repository 2v2
Designer Notes
Paul Jaquays, Skirmish Map Artist, talks about developing Repository:
Repository was the first map that we took to a completed, beautified state. To sell the idea of large-scale combat in the Halo setting, we needed a map that boldly said "Halo" with features familiar to players (and more importantly, the makers) of the original Halo settings. The point of this map was not to tell a story, but to send the message: "Ensemble Studios can do Halo." The Ensemble Studios method of operation was to get the game up and running as quickly as possible and then to iterate changes during development. This map had "iteration" as its middle name. The initial design from Vance Hampton called for a large lake with crossing paths through it. The idea was that the lake would reflect the sky and a Halo rising through it. No Halo artifact actually appears in Halo Wars, but we wanted to reinforce the idea of "Halo" in any way possible. The water tech wasn't quite ready for prime time, so we looked for alternatives. I suggested the idea of a large Forerunner artifact across a deep pit for the crossing. Ensemble modeler Rob Walden built it and development was off and running.
.jpg)
Early 2007 saw the first completed version of Repository (then called "the Halo map"). Primarily developed by Ensemble artist Patrick Thomas, this was a land of subtle terrain blending, muted colors, narrow paths, rough terrain, and the unrestricted placement of bases and other buildings. Players captured Forerunner power stations to earn resources. Very little of what can be seen in this map survived into the final game. The effects guys put a lot of effort into river that runs through the map, including the appearance of moving water, waterfalls, and spray. But the game was about to undergo an extensive refit, resulting in play much closer to the final version and the need to totally rework this map from the ground up. The river, sadly, became an early victim to those changes.
The decision to go with modular bases (all structures as attachments to the main base building) and the need for obvious, simple, wide pathing in the skirmish maps forced the team to make a hard choice. Scrap this map or rebuild it from scratch. Paths were laid out again by design, and my in-depth involvement with Repository began. Eventually, it became like a second home for me as play changes required tweak, after tweak, after tweak ... a process that went on for easily a year and a half.
.jpg)
The new "rules" for maps required specific locations for player bases, linked by clear paths. Paths were widened, terrain textures repainted and simplified, and large open areas flattened to become the new homes for player bases. Less map space could be used for unique terrain features. Drawing from a number of sources, including other Halo Wars maps, the E3 Demo, and Halo plant images by concept artist Won Choi, my paint over showed where I wanted to take Repository (it was still called the "Halo" map at that point). We had proved the point that we could do Halo, so this just needed to be an interesting map. I wanted to get across was that the large Forerunner structures would be the map's navigation landmarks. One full edge of the map had a Forerunner chasm. Another edge was defined by a massive building with a half-open door (adapted from the E3 Demo). One half of the map had natural canyon walls and paths. The other had metallic walls and roadways.
.jpg)
The concept painting was the work of an afternoon or so, but the work on the map itself would take weeks, spread out over months. A new central platform that I adapted and scaled up from one made by artist Matthew Goodman for the Artifact campaign scenario replaced the original. Ensemble artist Don Gagen did the final polish on it and other the other Forerunner artifacts. The lake shown in the paint over initially made it into the map -- you can see it in some of the many early screenshots made in Repository. But, as often happens during game development, it was eventually sacrificed to performance issues, losing the one truly unique landmark in the map.
.jpg)
Paul Jaquays is a former Ensemble Studios artist who now develops games as Senior Level Designer for CCP North America.
.jpg)
Tactics
Duncan Stanley, Community Manager for Robot Entertainment, on Repository:
Repository was one of the most played Playtest maps for me. Ben Donges and I would often team up to take people on in playtest on this map, and as I recall we were one of the first play a 1v1 no rush on this map and went head to head with full pop armies. Before the game was optimized for performance, it was a bit rough but a lot of fun. Some of the early iterations had problems with random crate placement, and I ended up with all of the crates on the map directly in front of my main base. I think I won that one.
As far as strategies go, the circular nature of the map and the distance in between starting locations often means a good bit of time goes by before the first attacks happen. And the narrow entrances towards each base make turrets a powerful defensive measure. I usually make a push early to capture an expansion very early on, and try to boom a bit to get some units. The Hook in the middle is a great way to get some veterancy for your units by killing the defenders and get a unit or two. A lot of people also don't expects through the hook since the defenders are pretty tough, so it can make a great way to surprise someone's lower base.
.jpg)
</toggledisplay>
1v1 Maps

Tundra
Blood Gulch
Chasms
Pirth Outskirts
Release
Barrens
Blood River
.jpg)
.jpg)
.jpg)
.jpg)
.jpg)
.jpg)
.jpg)
UNSC
In Halo Wars you’ll find that the UNSC field a very versatile arsenal. You can enlist the aid of Marines, Warthogs, Scorpions and Hornets to strategically control areas of the map or advance on new ones. Specialized UNSC leaders offer you further tactical abilities such as calling in support from Spirit of Fire above and highly specialized units that can make the difference between winning and losing.
Whether its close air support, infantry, or heavy armor, the UNSC can field the units to get the job done.
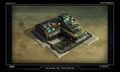
UNSC Firebase
The UNSC firebase combines the needs of a tactical communication command center and expansion into both a barrack and a production facility capable of assembling combat vehicles. The firebase itself is a variant of the old colony starter units constructed out of polycrete and powered by a small hydrogen reactor. Because gaining a foothold quickly was key to fighting insurrection throughout the colonies, Spirit of Fire can directly deploy the entire assembly unit of a firebase making it immediately useful. That ability has also proven invaluable in the ongoing war with the Covenant and is often considered a key advantage of the UNSC on the ground.
.jpg)
.jpg)
UNSC Firebase
.jpg)
"The best offence..." (MBT)
Turret defenses are available for Command Centers only, while battlefield commanders will have to defend their Fire Bases with their military units. Turrets are assembled below ground and then elevated into one of four available slots. A virtually unlimited supply of ammunition flows to the turret from below the base, allowing it keep firing as long as it’s exposed tower and weapon remains intact.
The base turret mount supports the very versatile M202 XP Machine Gun. It can be upgraded to the vastly superior M41 Light Anti-Aircraft Gun that is found on most Warthogs, firing the 12.7x99mm rounds. They can also be upgraded with Anti-Air Missles, Anti-Personel Flame Mortors, and Rail Cannons
.jpg)
- Armament
M202 XP Machine Gun
Bombard Rail Cannon
- Crew
Automated
- Role
Anti-Armor
Field Armory
The UNSC's Field Armory is a cross beatwean a machine \ fabrication shop, and a research labratory. This is where the most advanced technology for the UNSC is created by dedicated engineers and scientists.
UNSC can increase it's population cap here, as well as improve the turrets, and boost the speed of its infantry. There are also special technology that can only be researched by individual leaders.
.jpg)
Reactor
Power is everything. A UNSC firebase is powered by a small hydrogen reactor which allows it to operate some pretty sophisticated systems. In order to set up a base quickly, it has to be small, but these power plants are modular. As you expand your base of operations and field more complicated weapon systems you are going to need more power. Base sockets can facilitate the addition of larger hydrogen reactor units which provide the juice to allow you to field more and more sophisticated weaponry. These additional reactors built into your base sockets are even modular and can be upgraded, but at great expense, to double their output.
Protect your base reactors. They are prime targets for enemy raids. When they are destroyed, you will no longer be able to field your heavy hitting Scorpions or Vultures.
- HW-Reactor (render).jpg
- HW-Reactor (upgrades render).jpg
Supply Pad
The UNSC Supply Pad allows a base to recieve shipments from orbiting ships. The supplies are dropped shipped onto the pads where they are gathered by robot cranes and brought into the base. These crates contain the resources needed to build units, reasearch upgrades. Supply Pads are the economy behind the war machine of the UNSC, and can be upgraded to produce more resources faster.
.jpg)
Warthog - M12 LRV
Even the most minimal of firebases is able to produce the Warthog, and for good reason. These versatile vehicles are incredibly valuable for reconnaissance and can be refitted to fill a number of supporting roles for UNSC forces. The most basic of these variants doesn’t have the standard M41 Light Anti-Aircraft Gun equipped, sacrificing this firepower for speed, vital for recon patrols. Fire Bases have the ability to not only add the M41, but also the M68 Gauss Cannon to seriously boost the firepower of this unit against armored vehicles.
.jpg)
.jpg)
Barracks
This is no UNSC academy. The Barracks is a rustic shack compared to the comforts of a real training center, but then again a Marine in the field isn’t generally thinking about creature comforts. They make you soft.
The Barracks simply houses the raw recruits and equipment needed to field squads of UNSC Marines. A quick briefing, visit to the armory, and you’ve got boots on the ground.
- HW-Barracks (render).jpg
- HW-Barracks (upgrades render).jpg
.jpg)
Marines
“Boots on the ground.”
The backbone of UNSC ground forces is the Marine. The UNSC Marine Corps can trace its roots back all the way to the United States Marine Corp, formed in the 18th century. The people behind the triggers haven’t changed a great deal in all these years, far less so than the theaters of operation. Marines first started setting foot on other planets during the Interplanetary War (2160-2170), taking the fight to Mars and officially becoming the UNSC Marine Corps after their victory in that conflict.
Marines come equipped with a variety of weapons, but generally it’s the MA5 series of rifles. A squad of marines can lay down some impressive firepower, and can even damage armored vehicles with a volley of grenades or rockets if they’re available. Versatile, relatively cheap to equip, and fast get on the ground, Marines are a potentially strong force to put into action. En masse, they haul around enough firepower to put the hurt on just about anything an enemy can field.
- Armament
MA5 series battle rifle
Grenades
- Crew
5 person squad
- Role
All purpose
.jpg)
Flamethrower
“Hellbringers”
These specialized Marines are outfitted with a Napalm spewing NA4 Flamethrower. First seeing action during World War I, flamethrowers have changed remarkably little since those early days in the trenches. These specialized Marines carry a potent mixture with them in a tank that is spewed through a gun onto the target. A variety of mixtures have been created for work in various atmospheric and gravitational conditions, but they all work similarly to fry just about anything.
Squads of Flame Marines aren’t particularly common in the UNSC arsenal. Usually they are only called in to exterminate the most firmly entrenched enemies, which means that they also take plenty of casualties themselves. They know it’s a dirty job, but someone has to do it.
- Armament
NA4 Flamethrower
Flash Bang
- Crew
2 person squad
- Role
Anti-infantry
.jpg)
.jpg)
Spartan
.jpg)
“If they want war, we’ll give ‘em war.”
The Master Chief, John-117, didn’t always fight alone. He was part of the SPARTAN-II program that started with 150 child candidates, 33 of which made it through the intensive training and physical augmentation procedures. On November 1, 2525, the program was accelerated with the discovery of the Covenant threat and the Spartans adopted their MJOLNIR armor. The war was underway, and the UNSC had over thirty of these super soldiers at their disposal.
Summoning a Spartan to the battlefield is not a guarantee of victory, nor is it something to be taken lightly. It requires a significant investment of time and energy to field Spartans, so they’re not a commonplace sight. When they do end up on the scene though your opponent will have to learn to take the threat of a Spartan on the battlefield seriously, or suffer the consequences.
.jpg)
- Armament
MA5 series rifle
MJOLNIR armor
- Role
Special Forces
Covenant
Spirit of Fire
Exitus Acta Probat
.jpg)
CFV-88
Constructed: 2473
Class: Phoenix
Captain: Cutter
A.I.: On board - "Serina"
The Spirit of Fire was originally a colony ship, transporting equipment and colonists in the UNSC's expansion efforts. In 2520 the ship was refit with a Magnetic Accelerator Cannon and other armaments to serve as a warship. Huge storage bays that used to house machine parts now carry everything from Warthogs and Scorpion Tanks to construction supplies for fire bases in hot spots in front line engagements or in rearguard actions.
The campaign in Halo Wars follows the Spirit of Fire and her crew as the UNSC deals with the first deadly encounters with the Covenant.
Fichier:HW-Spirit of Fire logo.jpg
Timeline
Page 1
- 2160-2200
Early Conflicts:
- This period in human history was marked by a series of brutal conflicts between various governments and factions in our Solar System. Conflicts of particular historical importance included the Jovian Moons Campaign, The Rain Forest Wars, and a series of clashes on Mars.
- As overpopulation and political unrest on Earth increased, a number of new political movements formed. The most noteworthy dissident movements of the period were the "Koslovics" and the "Frieden" movement. The Koslovics—supporters of neo-Communist hardliner Vladimir Koslov—sought a return to the glory days of Communism and the elimination of corporate and capitalist influence, particularly in orbital facilities and offworld colonies.
- The Frieden movement was a resurgence of fascism, springing from anti-Koslovic sentiment that had taken root in the Jovian colonies (largely backed by Unified German Republic corporations, frequent targets of Koslovic "workers' crusades"). "Frieden" literally means "peace"—in this case, they believed that peace could be achieved only once the "oppressors on Terra Firma" were eliminated. [1]
.jpg)
- 2164
Interplanetary War:
- UN-sponsored military forces began a pattern of massive buildups, culminating in the first real interplanetary war. After the successful Marine deployment on Mars, recruitment drives and propaganda tactics strongly bolstered UNSC (United Nations Space Command) forces. UN forces defeated Koslovic and Frieden forces on Earth, then began a systematic and dedicated drive to crush their remnants on the various planets they held throughout the system. At the conclusion of these brushfire conflicts, Frieden and Koslovic forces were defeated in the face of a massive, unified and very powerful UN military. [1]
- 2170
Expansion:
- A unified Earth government was formed in the wake of these conflicts. Now, the victors were forced to deal with a less obvious but equally serious threat: overpopulation and a massive military that had no enemy to fight.
- In the postwar period there were massive population surges and the overpopulation, coupled with the destruction and famine bred by the Rain Forest Wars, threatened to destabilize the economy. [1]
- 2291
Faster Than Light:
- A team of researchers, physicists, and mathematicians working in secret developed the Shaw-Fujikawa Translight Engine, a practical means of propelling spacecraft across vast interstellar distances. This new engine allowed ships to tunnel into "the Slipstream" (also called "Slipspace"). Slipspace is a domain with alternate physical laws, allowing faster-than-light travel without relativistic side-effects. Faster-than-light travel is not instantaneous; "short" jumps routinely take up to two months, and "long" jumps can last six months or more.
- The SFTE generated a resonance field, which when coupled with the unusual physics of the Slipstream, allowed for dramatically shorter transit times between stars; however, scientists noted an odd "flexibility" to temporal flow while inside the Slipstream. Though no human scientist is sure why travel time between stars is not constant, many theorize that there are "eddies" or "currents" within the Slipstream—there is generally a five to ten percent variance in travel times between stars. This temporal inconsistency has given military tacticians and strategists fits—hampering many coordinated attacks. [1]
.jpg)
- 2310
First Wave:
- The Earth government unveiled the first in a line of colony ships—and volunteers were in great supply. Conditions on Earth had deteriorated in the face of overpopulation, so hitching a ride out to a colony became an attractive option.
Each colony ship was assigned military personnel and escort ships to help better utilize the massive (and expensive) standing fleets that, in the collapse of armed dissent, were soaking up a great deal of funding and resources.
Because FTL travel in this period was still fairly new and expensive, colonists and military personnel faced a stringent regimen of physical and mental testing. In theory, only the best-qualified citizens and soldiers were allowed to colonize "nearby" worlds. This was the birth of the Inner Colonies. [1]
- 2362
The Odyssey:
- The Odyssey launched on January 1, 2362. The lead ship in a fleet of colony vessels, the Odyssey—laden with troops and terraforming gear—spearheaded the colonization of a new world. This sparked the first wave of human expansion beyond the confines of the Solar System. [1]
- 2390
Inner Colonies:
- By 2390, the colonization of the Inner Colonies was fully underway. There were 210 human-occupied worlds in various stages of terraforming, and the population burden across human-controlled space was largely stabilized. [1]
- 2468
.jpg)
Harvest:
- The colony of Harvest is established in this year by the UNSC Skidbladnir. The ship is eventually used for materials to build the colony, its power plant is used to power the capital city of Utgard. [3]
- 2473
UNSC Spirit of Fire:
- The UNSC Spirit of Fire CFV-88 is constructed. It is a Phoenix class colony ship that is later refitted into a warship. [4]
Sources:
1 - Halo: Combat Evolved Timeline
2 - Halo: The Fall of Reach
3 - Halo: Contact Harvest
4 - Halo Wars
Page 2
- 2490
The Birth of the Outer Colonies:
- Expansion continued at a rapid pace, and by 2490 human space encompassed more than 800 worlds throughout the Orion Arm of the Milky Way (ranging from fairly well-tamed planetary strongholds to tiny hinterland settlements). Outward expansion continued, and the Inner Colonies become a political and economic stronghold, though they relied heavily on raw materials supplied by the Outer Colonies.
.jpg)
- During this period, the planet Reach (orbiting Epsilon Eridani, right on Earth's metaphorical doorstep) became the UNSC's primary Naval yard and training academy. Reach was a major producer of warships and colony vessels, as well as a training ground for covert operatives and Special Forces. [1]
- 2520
Spirit of Fire Refit:
- The UNSC Spirit of Fire undergoes a series of refits in this year that transform it from a colony ship into a warship. Refits include the addition of a Magnetic Accelerator Cannon to the ship.[4]
- 2525
February 3, Harvest:
- The Harvest orbital platform made long range radar contact with an object. It was made of an unknown material. Contact with Harvest was lost shortly thereafter. [2]
- 2525
April 20, The Argo:
- Sent by the Colonial Military Administration to investigate the loss of contact with Harvest, the scout ship Argo arrived in-system on 20 April. Other than a brief transmission to confirm their exit Slipstream position no further reports were made. [2]
- 2525
October 7, Contact:
.jpg)
- Fleet Command assembled a battlegroup to investigate and they enter the Harvest system on 7 October. The battlegroup consisted of the destroyer Heracles, commanded by Captain Veredi, as well as the frigates Arabia and Vostok.
- They discovered drastic changes to the planet Harvest’s surface and no sign of the three million colonists. An alien ship was detected in orbit. The ship did not attack until Captain Veredi tried to initiate communications. They responded by broadcasting the following message in the clear, in our own language: “Your destruction is the will of the Gods…and we are their instrument.”
- The Vostok and Arabia were lost with all hands while the Heracles jumped out of the system, but took several weeks to return to Reach due to damage sustained in the battle. [2]
- 2525
November 1, War:
- The UNSC is placed on full alert. Vice Admiral Preston Cole is mobilizing the largest fleet action in human history to retake the Harvest System and confront this new threat.
- The Spartan II program is accelerated to help deal with the new Covenant threat. [2]
- 2531
The Battle of Harvest:
- Admiral Cole's war fleet engages the alien warship responsible for the decimation of the colony, scoring a victory (though the battle cost Cole two-thirds of his battle group). Only a last minute tactical inspiration turned the tide of battle. After returning to Earth, Cole-promoted to Admiral-learns that a number of outlying colonies have been destroyed, leaving behind no survivors. Cole begins to move his fleet around, trying to intercept the invaders. Ground and ship-to-ship battles begin in earnest, raging throughout the Outer Colonies. During one ground engagement, Human forces capture one of the aliens. Before succumbing to his wounds, interrogators learn that the aliens refer to themselves as "the Covenant" (roughly translated). [1]
- 2535
.jpg)
The Outer Colony Massacres:
- Over the next four years, Cole's forces were hammered, despite his excellent leadership and tactical brilliance. It was simply a matter of being outgunned; Covenant kill ratios tend to top four to one in ship-to-ship combat.
- By November of 2535, virtually all of the Outer Colony worlds had been destroyed by the Covenant. The "Cole Protocol" was established by military order: All human vessels must ensure that Covenant forces do not find Earth. Human ships—when forced to withdraw—must not travel on an Earth-bound vector, even if that requires jumping into Slipspace without proper navigational calculations.
- If blind jumps are not possible, the ship's captain must order self-destruction if capture is imminent. In addition, it is also imperative that the powerful ship AI data cores not fall into Covenant hands, so part of this protocol involved either the removal or destruction of the ship's AI in extreme situations. [1]
- 2536-2552
The Siege of the Inner Colonies:
- Covenant forces swarmed into the Inner Colonies. For several years the war fell into a pattern: humans emerged victorious from isolated battles—typically during ground operations—but at a horrible cost. In space combat, the humans lost at a precipitous rate, and one by one, the colonies fell. [1]
- 2552
.jpg)
Halo:
- Covenant forces arrived at Reach and obliterated Earth's last major military stronghold. The battered cruiser, the Pillar of Autumn, fled the devastation, carrying with it the sole surviving SPARTAN. The SPARTANs—an elite unit of supercommandoes, equipped with the fearsome MJOLNIR assault armor—were created as the ultimate soldiers.
- Now, only one SPARTAN remains to carry the fight to the enemy. In accordance with the Cole Protocol, Captain Jacob Keyes—the Autumn's commanding officer—plotted a random, long-distance jump, hoping to lure the Covenant fleet away from Earth.
- After deactivating the drive, the Autumn dropped into a distant, uncharted system. There was a Covenant fleet in the system as well, near a planet-sized ring-shaped construct, "Halo." [1]
Sources:
1 - Halo: Combat Evolved Timeline
2 - Halo: The Fall of Reach
3 - Halo: Contact Harvest
4 - Halo Wars
Galleries
Screenshots
The images shown on this page are actual in-game screenshots and are not pre-rendered. Please click on any of the images below to view it at a larger size.
Featured Screenshot

XBOX Live Screenshots

.jpg)
.jpg)
.jpg)
.jpg)
Leipzig 2008 Screenshots


E3 2008 Screenshots


Screenshots


Older Screenshots


E3 2007 Screenshots


Concept Art
Before any game goes into full production on the art front, artists have to flesh out the look of the environments, people, and vehicles. These pieces of art can be of great inspiration when creating a game, allowing artists to easily try out ideas for great big environments or intricate units quickly and easily, without the restrictions of a game engine. Here is a collection of some of the early concepts that our teams has been working on for Halo Wars, we hope you enjoy them.
Please note that because concepting happens early in the development cycle, they often depict ideas, scenes, or units that may not appear in the game.
Environment Concepts


Unit Concepts


.jpg)

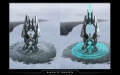
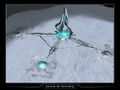
Forerunner Structures
- HW Puits sentinelles.jpg


Ambient Life Concepts


Renders
As we develop the game we hope to share a number of renders here on our website. The latest images to be added for from the Five Long Years cinematic that we released at E3 2008. We have also added a render of the UNSC Spirit of Fire model that will be used in various cinematics for the game. The Spirit of Fire and her crew are featured prominently in the campaign for Halo Wars.
If you'd like to set one of the images below as your desktop wallpaper, simply click on the image that you'd like to use below and then right-click on it and select "Set as Background".
Cinematic Screenshots
.jpg)
.jpg)
.jpg)
.jpg)
.jpg)
.jpg)
.jpg)
Halo: Reach: Stats site officiel de Halo (haloreachstats.halowaypoint.com)
Sélections
Anniversary Classic
Taille maximale du groupe : 8
Max joueurs en local : 4
Types de partie :
ANNIV. SLAYER, ANNIV. SNIPERS, ANNIV. 1 FLAG, ANNIV. 1 BOMB, ANNIV. ODDBALL, ANV. MULTIFLAG, ANNIV. ASSAULT
Cartes :
BEAVER CREEK, PRISONER, DAMNATION, HANG 'EM HIGH, HEADLONG
.jpg)
Anniversary Firefight
Taille maximale du groupe : 4
Max joueurs en local : 2
Types de partie :
FISTFIGHT, NADEFIGHT, ROCKETFIGHT, SNIPERFIGHT, FRGFIGHT, PLASMAFIGHT, FIESTAFIGHT, ARCADEFIGHT, ARCADEFIGHT NEP, FF LIMITED NEP
Cartes :
INSTALLATION 04
.jpg)
Big Team Battle
Taille maximale du groupe : 16
Max joueurs en local : 2
Types de partie :
TU ASSAULT, TU NEUTRAL BOMB, TU MULTIFLAG CTF, TU BIG TEAM SLAYER, TU BTB SNIPERS, TU STOCKPILE, TU TERRITORIES, TU ELITE SLAYER, TU 1 BOMB ASSAULT, TU 1 FLAG CTF, TU TEAM CRAZY KING, TU BTB HEAVIES
Cartes :
TEMPEST, TEMPTATION, HIGHLANDS, BREAKPOINT, BREAKNECK, RIDGELINE, HIGH NOON, SPIRE, BOARDWALK, PARADISO, HEMORRHAGE, BONEYARD, ABRIDGED, RENEGADE, UTOPIE, WAYONT, TRIDENT, MT LAM LAM, EMINENCE, SUPERSTITION, RASU, TYPHOON, BREAKOUT, HEADSTRONG, ASPHALT, GRAVEYARD, DELTA FACILITY, CRAGMIRE
.jpg)
Double Team
Taille maximale du groupe : 2
Max joueurs en local : 2
Types de partie :
TU 2V2 SLAYER, TU 2V2 SLAYER DMRS, TU 2V2 ODDBALL, TU 2V2 KING
Cartes :
UNANCHORED, ARENA ZEALOT, COUNTDOWN, ASYLUM, ENCLOSED, SYNAPSE, TREASURY, POWERHOUSE, REFLECTION, UNCAGED, BATTLE CANYON, SOLITARY
.jpg)
Firefight
Taille maximale du groupe : 4
Max joueurs en local : 2
Types de partie :
FISTFIGHT, NADEFIGHT, ROCKETFIGHT, SNIPERFIGHT, FRGFIGHT, PLASMAFIGHT, FIESTAFIGHT, ARCADEFIGHT, ARCADEFIGHT NEP, FF LIMITED, FF LIMITED NEP
Cartes :
INSTALLATION 04, BEACHHEAD, CORVETTE, COURTYARD, GLACIER, HOLDOUT, OUTPOST, OVERLOOK, UNEARTHED, WATERFRONT
.jpg)
Grifball
Taille maximale du groupe : 8
Max joueurs en local : 2
Types de partie :
GRIFBALL, DASH, ZEALOTBLARGBALL, BLARGBALL, JETPACK, JUMP PACK, HAND EGG GRIFBALL
Cartes :
BLOODY GRIFBALL, PINWHEEL, ORACLES REVENGE, ERORA, CLIFFSIDE, HIGH TIDE, CONCAVE ARENA, THE VIEW, INDOMITABLE, CLOVER X, PYRAMID, EXULTANT GFLECT , HEIMDALLS MIGHT, GET OFF MY LAWN, ALEMBIC GOLD, BELLE COURT, MANHATTAN PROJECT, BRIGHTSIDE, OMEGA TEMPLE, THE VAULT, GRIFBALL FOUNDRY, METHODICAL, IMPACT ARENA, SIERRA VISTA, MALICE N ENVY, TEMPLE PRIME, INSPIRATION, HYPERBARIC, FEDERATION SQUARE, ILLUMINATI
.jpg)
Invasion
Taille maximale du groupe : 12
Max joueurs en local : 4
Types de partie :
INVASION, INVASION SLAYER, INV SKIRMISH, S. SKIRMISH, E. SKIRMISH
Cartes :
BONEYARD, SPIRE, BREAKPOINT, HEMORRHAGE, PARADISO, TEMPEST, COUNTDOWN, BOARDWALK, POWERHOUSE, ANCHOR 9, UNANCHORED, REFINERY, OVERGROWTH, BROADCAST, FLOODGATE
.jpg)
Living Dead
Taille maximale du groupe : 12
Max joueurs en local : 4
Types de partie :
INFECTION, ALPHA ZOMBIES, ZOMBIE GHOSTS
Cartes :
ANCHOR 9, SOLITARY, PENANCE, BREAKNECK, CONDEMNED, UPLINK, ASYLUM, UNCAGED, REFLECTION, COUNTDOWN, BOARDWALK, POWERHOUSE, ARENA ZEALOT, BEDLAM, UNCONGEALED, PANDEMIC, COUNT D-HOUEN, DEADWALK, POWERLESS, SPOOKY BASE, PARASITIC
.jpg)
MLG
Taille maximale du groupe : 8
Max joueurs en local : 2
Types de partie :
MLG TEAM SLAYER V7, MLG CTF 5 FLAG V7, MLG CTF SANC V7, MLG CTF PIT V7, MLG KING V7
Cartes :
COUNTDOWN V7, BATTLE CANYON V7, PENANCE V7, SANCTUARY V7, ZEALOT V7, THE PIT V7, NEXUS V7, BATTLE CANYON V7, PENANCE V7
.jpg)
Multi Team
Taille maximale du groupe : 12
Max joueurs en local : 4
Types de partie :
TU TEAM HEADHUNTER, TU CRAZY KING, TU TEAM HOT POTATO, TU SLAYER, TU ELITE SLAYER, TU 3 BALL, TU ROCKET HOG RACE
Cartes :
TEMPEST, CONDEMNED, PENANCE, HIGH NOON, POWERHOUSE, BOARDWALK, SWORD BASE, REFLECTION, COUNTDOWN, ASYLUM, PINNACLE, ZEALOT, ARENA ZEALOT, PARADISO, BREAKPOINT, HIGHLANDS, HEMORRHAGE
.jpg)
Rumble Pit
Taille maximale du groupe : 8
Max joueurs en local : 4
Types de partie :
TU HEADHUNTER, TU JUGGERNAUT, TU CRAZY KING, TU ODDBALL, TU SLAYER, TU ELITE SLAYER, TU SLAYER DMRS, TU SLAYER PRO
Cartes :
ZEALOT, REFLECTION, COUNTDOWN, POWERHOUSE, SWORD BASE, PINNACLE, UNCAGED, ARENA ZEALOT, UPLINK, SOLITARY, PENANCE, BATTLE CANYON, HIGH NOON, BOARDWALK, ASYLUM, ANCHOR 9, UNANCHORED, TEMPEST
.jpg)
Score Attack
Taille maximale du groupe : 1
Max joueurs en local : 1
Types de partie :
SCORE ATTACK, 2X SCORE ATTACK, GRUNTPOCALYPSE, SKIRMIGEDDON, CRASHSITE, SNIPER ATTACK, ROCKET ATTACK, FRG ATTACK, FIESTA ATTACK, MYTHIC ATTACK
Cartes
INSTALLATION 04, BEACHHEAD, CORVETTE, COURTYARD, GLACIER, HOLDOUT, OUTPOST, OVERLOOK, UNEARTHED, WATERFRONT
.jpg)
Team Objective
Taille maximale du groupe : 10
Max joueurs en local : 4
Types de partie :
TU NEUTRAL BOMB, TU 1 BOMB ASSAULT, TU 1 FLAG CTF, TU 1 FLAG PRO, TU 3-FLAG CTF, TU 2 FLAG CLASSIC, TU MULTIFLAG CTF, TU 2 FLAG PRO, TU 2 FLAG SLAYER, TU CRAZY KING, TU TEAM HOT POTATO, TU NEUTRAL FLAG, TU SPEEDFLAG, TU 3 PLOTS, TU ASSAULT, TU STOCKPILE, TU TEAM HEADHUNTER, TU TERRITORIES, TU ODDBALL
Cartes :
CONDEMNED, TEMPEST, UNANCHORED, BATTLE CANYON, SOLITARY, PENANCE, HIGH NOON, ZEALOT, ASYLUM, PINNACLE, REFLECTION, COUNTDOWN, BOARDWALK, POWERHOUSE, SWORD BASE
.jpg)
Team Slayer
Taille maximale du groupe : 8
Max joueurs en local : 2
Types de partie :
SLAYER, ELITE SLAYER, SLAYER DMRS, SLAYER PRO
Cartes :
ANCHOR 9, TEMPEST, BATTLE CANYON, SOLITARY, PENANCE, HIGH NOON, CONDEMNED, UPLINK, COUNTDOWN, SWORD BASE, UNCAGED, POWERHOUSE, ASYLUM, REFLECTION, PINNACLE, AFFINITY, ENCLOSED, KINGDOM, SYNAPSE, TREASURY, THINK TWICE, PRECIPICE, CHATEAU, EDEN MINOR, RENOVA, BOARDWALK, ARENA ZEALOT, TEMPLE, ELLUL, IMAGO, MIDAS, PULSE, UNCONQUERED
.jpg)
Team Snipers
Taille maximale du groupe : 8
Max joueurs en local : 4
Types de partie :
SNIPERS, SNIPERS PRO
Cartes :
TEMPEST, BREAKPOINT, HIGHLANDS, BREAKNECK, RIDGELINE, HIGH NOON, UNCAGED, BOARDWALK, HEMORRHAGE, REFLECTION, POWERHOUSE, PENANCE, COUNTDOWN, ARENA ZEALOT
.jpg)
Team SWAT
Taille maximale du groupe : 8
Max joueurs en local : 4
Types de partie :
SWAT, SWAT MAGNUMS, SWAT POTATO, SWAT STOCKPILE, SWAT 3 PLOTS
Cartes :
CONDEMNED, UPLINK, UNANCHORED SWAT, BATTLE CANYON, SOLITARY, PENANCE, HIGH NOON, ASYLUM, PINNACLE, UNCAGED, REFLECTION, COUNTDOWN, BOARDWALK, SWORD BASE, ARENA ZEALOT, COUNTDOWN SWAT, POWERHOUSE SWAT, REFLECTION SWAT, ZEALOT SWAT, POWERHOUSE, ASYLUM SWAT, TEMPLE
.jpg)
The Arena
Taille maximale du groupe : 4
Max joueurs en local : 2
Types de partie :
TU ARENA SLAYER
Cartes :
ARENA ZEALOT, REFLECTION, COUNTDOWN, BOARDWALK, POWERHOUSE, SWORD BASE, ASYLUM, UNCAGED, UNANCHORED, UPLINK, BATTLE CANYON, ENCLOSED, KINGDOM, SYNAPSE, IMAGO, PULSE
.jpg)
Super Slayer
Taille maximale du groupe : 4
Max joueurs en local : 2
Types de partie :
TU SLAYER, TU SLAYER DMRS, TU SLAYER PRO, ZB SLAYER DMRS
Cartes :
ANCHOR 9, TEMPEST, BATTLE CANYON, SOLITARY, PENANCE, HIGH NOON, CONDEMNED, UPLINK, COUNTDOWN, SWORD BASE, UNCAGED, POWERHOUSE, ASYLUM, REFLECTION, PINNACLE, ENCLOSED, KINGDOM, SYNAPSE, EDEN MINOR, BOARDWALK, ARENA ZEALOT, TEMPLE, ELLUL, IMAGO, MIDAS, PULSE, UNCONQUERED
.jpg)